Revenge is Sweet
Team News: Kermit and Rizzo were back, Big Bird and Fozzie dropped out, A. Muppet and Oscar unavailable, Neil filled in. With no goalkeeper in the line-up, Rizzo took up the task.
Previous Results: Played 2 Lost 2 - First game was a hammering, last season's game was a second half capitulation from a winning position.
First Half
Goal 1-0 // Neil - Assist 4 Beaker
Beaker sends a kick in into Neil's feet as the ball is brought around his left side; the defender goes the wrong way to leave Neil in on goal. His first time shot across goal is well placed if a little fortunate coming off the bottom of his shin. Lovely goal to provide the perfect start.
Although just early in its life the game looked immediately promising for CBFC's attacking viewpoint. Having already scored with the first chance just moments after kick off good play all round provided another chance at goal but Chef couldn't guide the ball into the far corner as attempted with perhaps the wrong shot choice. The Takes 6 To Tango team were using a different set of players to previous matches, it showed as they ran into trouble regularly. With Kermit marshalling an attacker sideways Neil pinched the ball, bringing the ball forward he sent the ball wide to Chef, with time to turn he played the cross to the far post for Kermit. Neil at the midway point of the cross was free for a shot. The keeper matched him and the ball was cleared. Kermit again starting a move put through Chef on the wing but his finishing was not up to standard with another wasted go at goal.
Goal 1-1 // Takes 6 To Tango
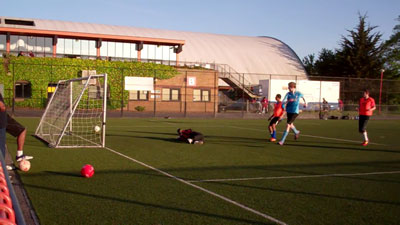
With Rizzo twiddling his thumbs his first real involvement was high class. Having got in behind the defence the striker took the ball down superbly well for a crack at Rizzo's goal, diving to make the save he denied any chance of an equaliser with the first chance Tango got. The ball was intercepted as it was played out, but with the pressure back on Gonzo made another clearance, but as per before, again the ball was won in the CBFC half leading to Tango to have a little rub of the green. Why? Well a poor shot on goal from an untracked runner finds itself falling for the striker in the box, the same striker Rizzo denied seconds before but this time his efforts to keep out the danger were in vain. A little similar to Big Bird's second goal in the previous match, minus the tackling part on the first shot.
Having the scores level was a kick in the teeth, CBFC were by far the better team and Takes 6 To Tango pulled through a lucky break, nevertheless the players got back to work.
Goal 2-1 // 14 Kermit - Assist 17 Swedish Chef
Excellent play ending in the goal to rightfully take back the lead. As the ball comes back out of defence, Kermit wins the ball sends it promptly out wide for Neil, his flick switches play. Swedish Chef controls the ball flicks it past the incoming defender picking out Kermit who had already continued his run into the box for a clinical finish.
As the match rolled on both sides had a chance each, the leaders with the first but struggling in front of goal Swedish Chef wasted his chance of getting on the scoresheet while Takes 6 To Tango were let down on the counterattack after one of their players failed miserably in crossing the ball.
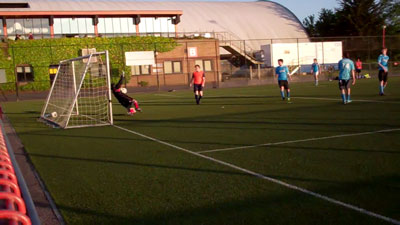
Goal 3-1 // 4 Beaker - Assist Neil
With a clear blue sky in the early evening it was Beaker who put daylight between the sides. Rizzo's first goalkick of the match following through Beaker to Neil, the pass across was perfectly placed onto Beaker's run as he shuffled away from the incoming defender before slipping the ball past the keeper into the far side netting. The three goals all coming with the first shot from each scorer, a little stat worth knowing.
Tango needed to score and they came so close so soon. Rizzo brilliantly dived to make the save after a one two was played through the defence. From the resulting kick in somehow a perfectly struck volley from the unmarked player was blazed back across goal from deep inside the box. Neil playing very well was unlucky in three attempts in a row as he tried to unleash Chef on goal. The six Tango's were showing some fight as they caught CBFC out and broke through on goal with Beaker the lone defender. Gonzo got back fast and almost managed to clear the ball but as the ball trickled through, Rizzo again had to be quick in diving to the ground making another save.
Tango crept forward on the shots tally, hitting the crossbar in the process and on the half time whistle Rizzo made a simple save. In between the shots Kermit intercepted a poor goalkick before volleying just inches wide of the mark.
Second Half
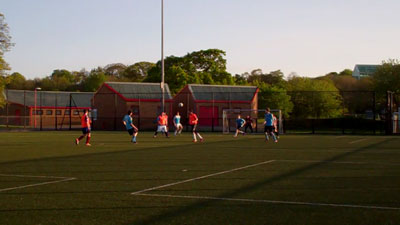
The match score on the sides had a resigned feel as no real pressure from either side resulted in a stalemate for a large period. Kermit hit the post as he went in search of his second goal. Rizzo was comfortable in goal and should have been tested in Tango's best move of the match where the end shot was put wide. In fact Tango let themselves down here and could only blame themselves as they showed how good they were in their build up play passing the ball quickly and accurately.
Goal 4-1 // Neil - Assist 14 Kermit
From Gonzo heading the ball clear, Swedish Chef picks the ball up nutmegs the incoming player before laying the ball off to Beaker. His pass to Kermit results in a chipped ball into the Tango box. Neil coming in from the left heads the ball over the keeper as it loops into the top corner with the goal cementing the win.
Tango looked down and out at this stage, they struggled to find a way through the defence and they would have needed something special to have beaten Rizzo in what turned out to be a casual run out in goal. On the other hand certain CBFC players were going for more goals including Neil on a hattrick was played in by Beaker but with the defender on his case he put his chance over the crossbar. With the goalkeeper a bit too keen on pushing for a way back into the match by taking his goalkick a bit too quick Beaker poached the ball 20 yards from goal with a view to scoring his second but lacking some anger.
Swedish Chef having a poor run in front of goal in this season's cup games struggled to find the net, especially when put through by Neil, opting for a laces shot over the chip shot. Takes 6 To Tango gave Rizzo a few stops to make before the end of the match in both catching a shot and diving low to his left in what turned out to be a comfortable 11th consecutive win with Rizzo in the side. Gonzo, Kermit and Beaker continued the excellent defensive record in what has been a key improvement to the side.
Full-Time Result: Cillit Bang FC 4-1 Takes 6 To Tango